> ## Documentation Index
> Fetch the complete documentation index at: https://docs.dodopayments.com/llms.txt
> Use this file to discover all available pages before exploring further.
# Xây dựng dịch vụ email trả trước với tính phí dựa trên credit
> Xây dựng MailKit, một nền tảng email giao dịch với credit email trả trước. Gói đăng ký hàng tháng, các gói nạp thêm một lần, tự động trừ credit ngay khi gửi và cảnh báo chủ động khi số dư thấp, được hỗ trợ bởi Resend và Dodo Payments.
Để Sentra viết mã tích hợp cho bạn.
Sử dụng trợ lý AI của chúng tôi trong VS Code, Cursor hoặc Windsurf để tạo mã SDK/API, trình xử lý webhook và nhiều nội dung khác chỉ bằng cách mô tả điều bạn muốn.
Dùng thử Sentra: Tích hợp được hỗ trợ bởi AI →
Trong tutorial này, bạn sẽ xây dựng **MailKit**, một nền tảng email giao dịch nơi khách hàng thanh toán trước cho một lượng credit email. Gói đăng ký cấp một hạn mức email hàng tháng; khi sắp hết, khách hàng có thể mua một gói nạp thêm thay vì chờ chu kỳ tiếp theo. Mỗi lần gửi sẽ tự động trừ một credit.
Tutorial này sử dụng [Resend](https://resend.com) làm nhà cung cấp email. Gói miễn phí của dịch vụ này (3.000 email/tháng) đủ để xây dựng và kiểm thử toàn bộ quy trình mà không cần tài khoản trả phí. Mẫu này hoạt động với mọi nhà cung cấp; hãy thay `resend.emails.send` bằng SendGrid, Postmark, SES hoặc SMTP relay của riêng bạn.
Kết thúc tutorial này, bạn sẽ biết cách:
* Tạo entitlement credit tùy chỉnh (email) trong dashboard
* Gắn credit vào một gói đăng ký và một sản phẩm nạp thêm một lần
* Gửi email thực qua Resend và trừ một credit cho mỗi lần gửi bằng một ledger entry
* Truy vấn số dư credit trực tiếp từ frontend
* Xác minh webhook Dodo chính xác và xử lý `credit.balance_low` để nhắc khách hàng trước khi số dư về 0
## Những gì chúng ta sẽ xây dựng
Sau đây là mô hình giá của MailKit:
| Sản phẩm | Giá | Email |
| ------------ | ----------- | ------------------ |
| Gói MailKit | \$19/tháng | 5.000 email/chu kỳ |
| Gói nạp thêm | \$9 một lần | +5.000 email |
Đơn vị tính là **một email = một credit**. Khách hàng không cần quan tâm đến token, batch hay đơn vị có trọng số. Họ chỉ thấy thông báo "bạn còn 4.231 email trong tháng này."
Trước khi bắt đầu, hãy đảm bảo bạn có:
* Tài khoản Dodo Payments (chế độ test là đủ)
* Tài khoản [Resend](https://resend.com) miễn phí và API key
* Node.js 18+ và kiến thức cơ bản về TypeScript
## Bước 1: Tạo entitlement credit email
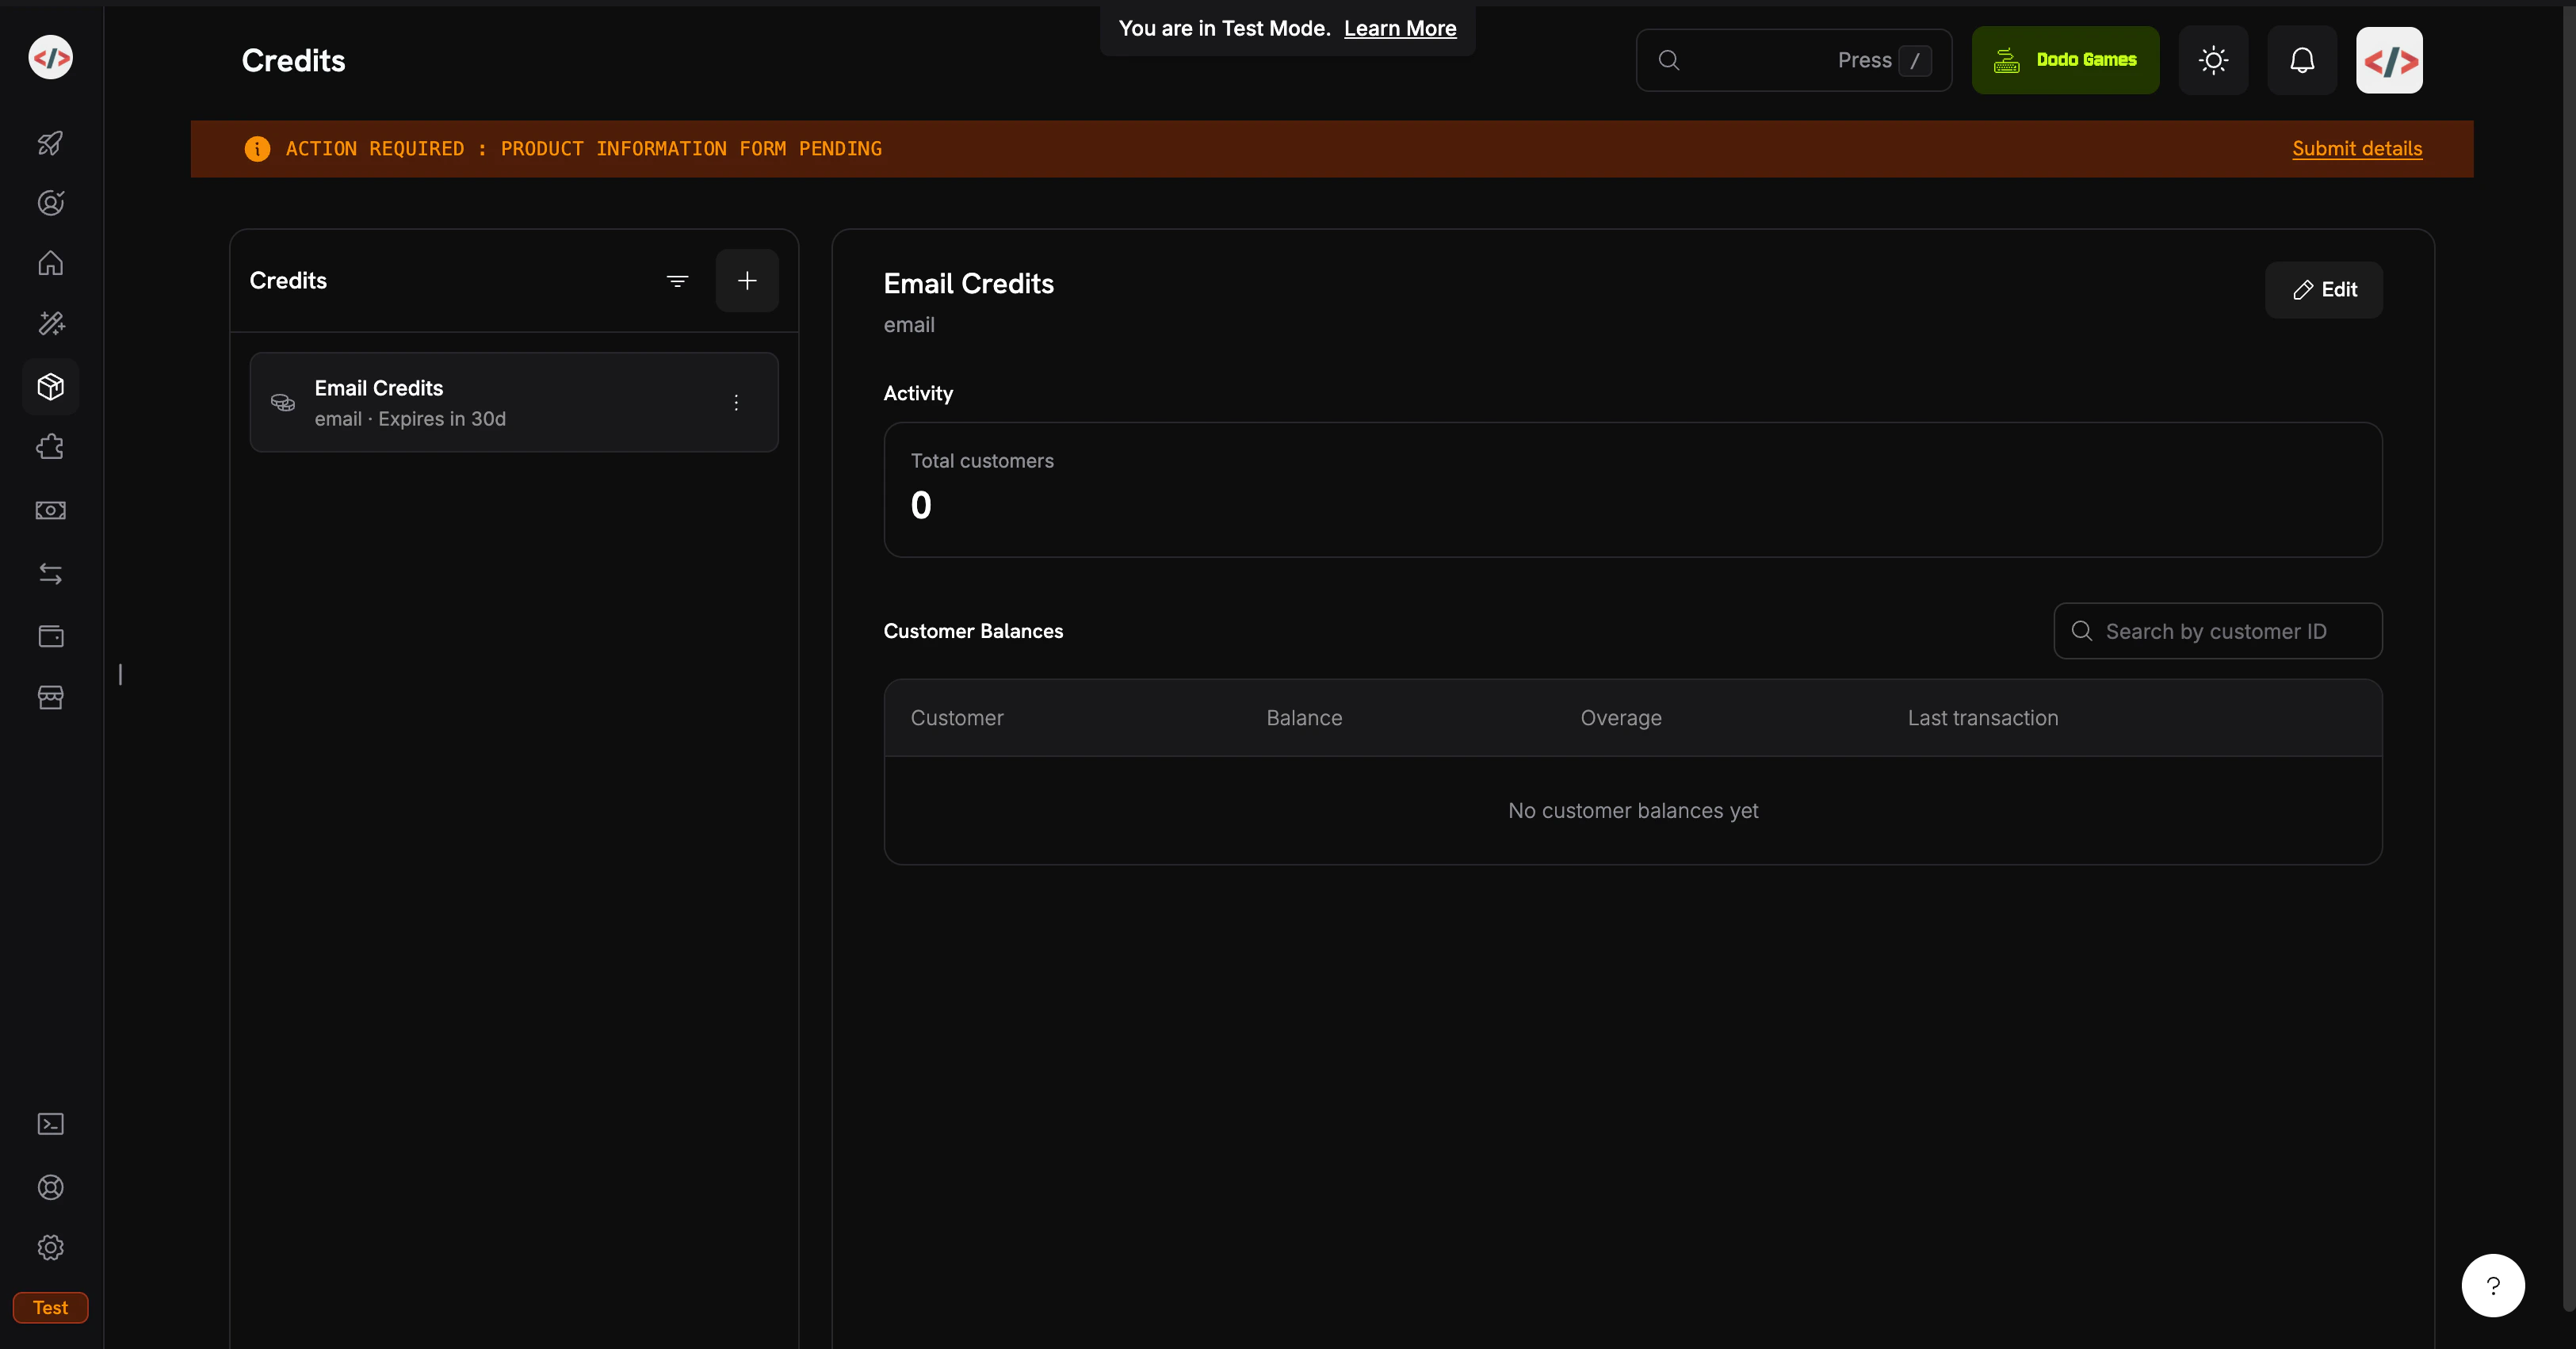
Entitlement credit xác định đơn vị mà nền tảng của bạn bán: trong trường hợp này là một lần gửi email.
1. Đăng nhập vào dashboard Dodo Payments của bạn
2. Nhấp vào **Products** trong thanh bên trái
3. Chọn tab **Credits**
4. Nhấp vào **Create Credit**
Điền thông tin credit:
**Credit Name**: `Email Credits`
**Credit Type**: Chọn **Custom Unit**
**Unit Name**: `email`
**Precision**: `0` (email luôn là một đơn vị nguyên; bạn không thể gửi nửa email)
**Credit Expiry**: `30 days` (hạn mức của mỗi chu kỳ sẽ được đặt lại)
Không thể thay đổi Precision sau khi tạo. Với các đơn vị rời rạc như email, message hoặc session, `0` là lựa chọn chính xác.
Trong cookbook này, chúng ta sẽ không bật rollover hoặc overage; mục tiêu là quy trình CBB đơn giản nhất có thể. Bạn có thể xem lại các tùy chọn này sau trong phần gắn credit.
Nhấp vào **Create Credit**. Mở credit và sao chép ID của nó. Bạn sẽ cần ID này để truy vấn số dư từ backend. ID có dạng `cent_xxxxxxxxxxxx`.
Entitlement `Email Credits` của bạn đã sẵn sàng. Tiếp theo là các sản phẩm cấp credit cho khách hàng.
## Bước 2: Tạo gói đăng ký và gói nạp thêm
Bạn sẽ tạo hai sản phẩm: gói **Subscription** định kỳ và gói nạp thêm **Single Payment**. Gói đăng ký cấp 5.000 email mỗi chu kỳ; gói nạp thêm bổ sung 5.000 email theo nhu cầu. Cả hai đều gắn cùng entitlement `Email Credits`.
Cookbook này trừ credit bằng ledger entry trực tiếp thay vì meter dựa trên mức sử dụng. Ledger entry có hiệu lực ngay lập tức (số dư được cập nhật trong vài mili giây), không cần thiết lập thêm và phù hợp khi một hành động của người dùng tương ứng chính xác với một credit. Nếu muốn tự động trừ từ các usage event đã ingest (hữu ích với các đơn vị có trọng số như "token" hoặc "MB đã xử lý"), hãy xem [Credit-Based Billing → Usage Billing with Credits](/features/credit-based-billing) để tham khảo mẫu dựa trên meter.
### Gói MailKit (\$19/tháng, 5.000 email)
1. Đi đến **Products → Create Product**
2. Điền thông tin sản phẩm:
**Product Name**: `MailKit Plan`
**Description**: `5,000 transactional emails per month.`
3. Chọn **Subscription** làm loại sản phẩm
4. Thiết lập giá định kỳ:
**Recurring Price**: `19.00`
**Billing Cycle**: `Monthly`
**Currency**: `USD`
Cuộn đến **Entitlements → Credits → Attach** và cấu hình:
**Credit Entitlement**: `Email Credits`
**Credits issued per billing cycle**: `5000`
**Low Balance Threshold**: `20` (phần trăm; kích hoạt `credit.balance_low` khi số dư giảm xuống dưới 20% hạn mức chu kỳ, tức 1.000 email)
**Import Default Credit Settings**: đã bật (sử dụng thời hạn 30 ngày từ Bước 1)
Nhấp vào **Add to Product**, sau đó **Save** sản phẩm. Sao chép product ID (`pdt_xxxxxxxxxxxx`).
Gói đăng ký: \$19/tháng → 5.000 email được làm mới mỗi chu kỳ.
### Gói nạp thêm (\$9 một lần, 5.000 email)
1. Đi đến **Products → Create Product**
2. Điền thông tin sản phẩm:
**Product Name**: `Email Top-Up Pack`
**Description**: `Add 5,000 emails to your MailKit balance instantly.`
3. Chọn **Single Payment** làm loại sản phẩm
4. Thiết lập giá:
**Price**: `9.00`
**Currency**: `USD`
Trong **Entitlements → Credits → Attach**:
* Credit Entitlement: `Email Credits`
* Credits issued: `5000`
Sản phẩm một lần cấp credit với thời hạn riêng (30 ngày kể từ ngày mua, theo Bước 1). Credit nạp thêm được cộng dồn trên credit đăng ký; chúng không thay thế credit đăng ký.
Lưu và sao chép product ID.
Gói nạp thêm: \$9 → +5.000 email, có ngay lập tức.
## Bước 3: Thiết lập backend
Bây giờ hãy xây dựng Express server để xử lý checkout, gửi email, truy vấn số dư và webhook.
```bash theme={null}
mkdir mailkit && cd mailkit
npm init -y
npm install dodopayments resend express dotenv
npm install -D tsx @types/node @types/express
```
Thêm dev script vào `package.json`:
```json theme={null}
{
"scripts": {
"dev": "tsx watch server.ts"
}
}
```
[`tsx`](https://tsx.is) chạy TypeScript trực tiếp mà không cần bước build hoặc `tsconfig.json`, rất phù hợp cho tutorial. Trong production, hãy thêm script `tsconfig.json` và `build`.
Tạo `.env`:
```bash .env theme={null}
# Dodo Payments
DODO_PAYMENTS_API_KEY=your_dodo_test_api_key
DODO_WEBHOOK_KEY=your_dodo_webhook_signing_key
CREDIT_ENTITLEMENT_ID=cent_xxxxxxxxxxxx
PLAN_PRODUCT_ID=pdt_xxxxxxxxxxxx
TOPUP_PRODUCT_ID=pdt_xxxxxxxxxxxx
# Resend
RESEND_API_KEY=re_xxxxxxxxxxxx
# App
BASE_URL=http://localhost:3000
PORT=3000
```
Bạn sẽ điền `DODO_WEBHOOK_KEY` ở Bước 4 sau khi tạo endpoint. API key của Resend lấy từ [resend.com/api-keys](https://resend.com/api-keys).
Hãy thêm `.env` vào `.gitignore` ngay lập tức. Không bao giờ commit API key.
Tạo `server.ts` trong thư mục gốc của project:
```typescript server.ts expandable theme={null}
import 'dotenv/config';
import express, { Request, Response } from 'express';
import DodoPayments from 'dodopayments';
import { Resend } from 'resend';
const app = express();
const dodo = new DodoPayments({
bearerToken: process.env.DODO_PAYMENTS_API_KEY!,
webhookKey: process.env.DODO_WEBHOOK_KEY!,
environment: 'test_mode',
});
const resend = new Resend(process.env.RESEND_API_KEY!);
const CREDIT_ENTITLEMENT_ID = process.env.CREDIT_ENTITLEMENT_ID!;
const BASE_URL = process.env.BASE_URL!;
// ---------------------------------------------------------------
// Webhook endpoint MUST receive the raw body for signature
// verification. Register it BEFORE express.json().
// ---------------------------------------------------------------
app.post(
'/webhooks/dodo',
express.raw({ type: 'application/json' }),
async (req: Request, res: Response) => {
const headers = {
'webhook-id': req.headers['webhook-id'] as string,
'webhook-signature': req.headers['webhook-signature'] as string,
'webhook-timestamp': req.headers['webhook-timestamp'] as string,
};
let event: any;
try {
event = await dodo.webhooks.unwrap(req.body.toString('utf8'), { headers });
} catch (err) {
console.error('Webhook signature verification failed:', err);
return res.status(401).json({ error: 'invalid signature' });
}
switch (event.type) {
case 'credit.balance_low': {
const { customer_id, credit_entitlement_name, available_balance, threshold_percent } =
event.data;
console.log(
`[low-balance] ${customer_id} has ${available_balance} ${credit_entitlement_name} ` +
`left (under ${threshold_percent}%)`
);
await notifyCustomerLowBalance(customer_id, Number(available_balance));
break;
}
case 'credit.added':
console.log('[credit.added]', event.data);
break;
case 'credit.rolled_over':
console.log('[rolled_over]', event.data);
break;
}
res.json({ received: true });
}
);
// JSON parsing for everything else.
app.use(express.json());
// ---------------------------------------------------------------
// POST /checkout/subscribe → start the MailKit subscription.
// ---------------------------------------------------------------
app.post('/checkout/subscribe', async (req, res) => {
const { email, name } = req.body as { email: string; name: string };
const session = await dodo.checkoutSessions.create({
product_cart: [{ product_id: process.env.PLAN_PRODUCT_ID!, quantity: 1 }],
customer: { email, name },
return_url: `${BASE_URL}/?subscribed=1`,
});
res.json({ checkout_url: session.checkout_url });
});
// ---------------------------------------------------------------
// POST /checkout/topup → buy a 5,000-email top-up for an existing
// customer. In a real app, customer_id is resolved from the
// authenticated session, never trusted from request input.
// ---------------------------------------------------------------
app.post('/checkout/topup', async (req, res) => {
const { customer_id } = req.body as { customer_id: string };
const session = await dodo.checkoutSessions.create({
product_cart: [{ product_id: process.env.TOPUP_PRODUCT_ID!, quantity: 1 }],
customer: { customer_id },
return_url: `${BASE_URL}/?topped_up=1`,
});
res.json({ checkout_url: session.checkout_url });
});
// ---------------------------------------------------------------
// GET /credits/:customerId → live balance for the dashboard widget.
// ---------------------------------------------------------------
app.get('/credits/:customerId', async (req, res) => {
const balance = await dodo.creditEntitlements.balances.retrieve(req.params.customerId, {
credit_entitlement_id: CREDIT_ENTITLEMENT_ID,
});
res.json({ balance: balance.balance });
});
// ---------------------------------------------------------------
// POST /send → send an email via Resend, then write a ledger entry
// to debit 1 credit from the customer's balance. The deduction is
// instant; the next /credits call reflects it.
// ---------------------------------------------------------------
app.post('/send', async (req, res) => {
const { customer_id, to, subject, html } = req.body as {
customer_id: string;
to: string;
subject: string;
html: string;
};
// 1. Pre-flight balance check: refuse to send if the balance is at zero.
const balance = await dodo.creditEntitlements.balances.retrieve(customer_id, {
credit_entitlement_id: CREDIT_ENTITLEMENT_ID,
});
if (Number(balance.balance) <= 0) {
return res.status(402).json({
error: 'No email credits remaining. Buy a top-up pack or upgrade your plan.',
});
}
// 2. Send via Resend.
const { data, error } = await resend.emails.send({
from: 'MailKit ', // swap for your verified domain
to: [to],
subject,
html,
});
if (error) {
return res.status(500).json({ error: error.message });
}
// 3. Debit 1 credit. Resend's message id is the idempotency key, so if
// the client retries this request, Dodo deduplicates and the
// customer is only debited once for that send.
await dodo.creditEntitlements.balances.createLedgerEntry(customer_id, {
credit_entitlement_id: CREDIT_ENTITLEMENT_ID,
amount: '1',
entry_type: 'debit',
reason: `email send ${data!.id}`,
idempotency_key: data!.id,
});
res.json({ id: data!.id });
});
async function notifyCustomerLowBalance(customerId: string, available: number) {
// In production: send an email to the account owner, push a banner,
// open an in-app modal, etc. For the demo we just log.
console.log(`[NOTIFY] ${customerId}: ${available} emails left. Consider topping up.`);
}
app.use(express.static('public'));
const port = Number(process.env.PORT) || 3000;
app.listen(port, () => {
console.log(`MailKit running on http://localhost:${port}`);
});
```
**Webhook body phải ở dạng raw.** `express.json()` phân tích cú pháp rồi tuần tự hóa lại body, khiến việc xác minh chữ ký bị lỗi. Hãy định nghĩa `/webhooks/dodo` bằng `express.raw()` *trước* dòng `app.use(express.json())`.
Backend đã sẵn sàng: subscription, top-up, balance, send và webhook handler đều đã được kết nối.
Tạo `public/index.html`:
```html public/index.html expandable theme={null}
MailKit Demo
MailKit
Prepaid transactional email, billed per send.
1. Subscribe to MailKit ($19/mo, 5,000 emails)
2. Check your balance
3. Send a transactional email
4. Run low? Buy a top-up pack
```
## Bước 4: Kết nối webhook endpoint
Event `credit.balance_low` giúp bạn nhắc khách hàng *trước khi* họ hết credit. Nếu không có event này, lần đầu họ nhận ra vấn đề sẽ là khi email không thể gửi.
Webhook cần một URL công khai. Trong quá trình phát triển, hãy dùng [ngrok](https://ngrok.com) (hoặc tunnel bất kỳ):
```bash theme={null}
ngrok http 3000
```
Sao chép URL chuyển tiếp HTTPS (ví dụ: `https://1234abcd.ngrok-free.app`).
1. Đi đến **Developers → Webhooks → Add Endpoint**
2. **URL**: `https://1234abcd.ngrok-free.app/webhooks/dodo`
3. **Events**: đăng ký `credit.added`, `credit.balance_low` và `credit.rolled_over`
4. Lưu, sau đó sao chép **signing key** vào `.env` dưới tên `DODO_WEBHOOK_KEY`
5. Khởi động lại server
## Bước 5: Kiểm thử toàn bộ quy trình
```bash theme={null}
npm run dev
```
Bạn sẽ thấy `MailKit running on http://localhost:3000`. Mở nó trong trình duyệt.
1. Trong phần 1, nhập email và tên test, nhấp **Get checkout link**
2. Mở liên kết, hoàn tất checkout bằng [test card](/miscellaneous/testing-process)
3. Sau khi thanh toán, tìm `customer_id` trong dashboard tại **Customers**
Giờ đây khách hàng sẽ có **5.000 email** trong số dư. Kiểm tra **Customers → \[Customer] → Credits**.
1. Dán `customer_id` vào phần 3
2. Giữ `to` ở giá trị `delivered@resend.dev` (sandbox inbox của Resend chấp nhận mọi email)
3. Nhấp **Send**
Bạn sẽ nhận lại message id từ Resend. Làm mới số dư ở phần 2 và số lượng sẽ ngay lập tức giảm xuống 4.999. Mỗi khoản ghi nợ trong ledger được phản ánh vào số dư trực tiếp ngay khi được ghi.
Ngưỡng là 20% (1.000 trên hạn mức 5.000 email). Để kích hoạt mà không cần gửi 4.000 email thật, hãy **trừ số dư thủ công** từ dashboard:
1. Đi đến **Customers → \[Customer] → Credits → Email Credits**
2. Nhấp **Adjust Balance** và trừ `4000`
3. Gửi thêm một email qua bản demo
Server của bạn sẽ ghi log trong vài giây:
```
[low-balance] cus_xxx has 999 Email Credits left (under 20%)
[NOTIFY] cus_xxx: 999 emails left. Consider topping up.
```
Server đã nhận và xác minh webhook. Trong production, đây là nơi bạn gửi email cho khách hàng hoặc hiển thị banner trong ứng dụng.
1. Dán `customer_id` vào phần 4
2. Nhấp **Buy 5,000 emails**, hoàn tất checkout test
3. Làm mới số dư và số lượng sẽ tăng thêm 5.000
Một event `credit.added` được kích hoạt với `grant_source: one_time`. Gói nạp thêm được cộng dồn trên credit đăng ký; cả hai pool đều được tiêu thụ theo FIFO (grant chưa hết hạn cũ nhất trước).
Trừ số dư thủ công về 0, sau đó thử gửi thêm một email. Bạn sẽ nhận được:
```json theme={null}
{ "error": "No email credits remaining. Buy a top-up pack or upgrade your plan." }
```
Mã 402 đó là cơ chế thực thi ở cấp ứng dụng. API balance của Dodo là nguồn dữ liệu chính xác; không bao giờ cache giá trị này trên client.
## Xử lý sự cố
Chữ ký được tính trên raw HTTP body. `express.json()` phân tích cú pháp rồi tuần tự hóa lại payload, khiến HMAC bị lỗi. Đảm bảo `/webhooks/dodo` được đăng ký bằng `express.raw({ type: 'application/json' })` *bên trên* dòng `app.use(express.json())` và `DODO_WEBHOOK_KEY` khớp với signing key hiển thị trên trang thông tin chi tiết của endpoint.
Có ba điều cần xác minh, theo thứ tự này:
1. Khách hàng đã **hoàn tất checkout** (credit được cấp sau khi thanh toán thành công, không phải khi tạo session)
2. `CREDIT_ENTITLEMENT_ID` trong `.env` khớp với credit được gắn vào sản phẩm (ID không khớp sẽ âm thầm ghi vào credit sai)
3. `customer_id` bạn truyền vào đến từ Dodo (bảng `customers` trong dashboard), không phải database riêng của bạn
Sender sandbox `onboarding@resend.dev` chỉ gửi đến email trên tài khoản Resend của bạn hoặc `delivered@resend.dev`. Để gửi cho người khác, [verify a domain](https://resend.com/docs/dashboard/domains/introduction) và sử dụng địa chỉ `from` trên domain đó.
## Những gì bạn đã xây dựng
`Email Credits`, được định nghĩa một lần và gắn vào cả gói đăng ký lẫn gói nạp thêm.
\$19/tháng cấp 5.000 email mỗi chu kỳ. Khách hàng biết họ đang trả tiền cho điều gì, còn bạn biết chi phí tối đa của mình.
Một sản phẩm mua một lần cấp 5.000 email. Được cộng dồn trên credit đăng ký mà không cần thay đổi gói.
Một lệnh gọi `createLedgerEntry` duy nhất sau mỗi lần gửi. Không cần meter, không có độ trễ tổng hợp, idempotent khi retry nhờ message id của Resend.
Đọc tài liệu CBB đầy đủ để tìm hiểu về rollover, các chế độ overage, quản lý ledger và toàn bộ API surface.
Cần trợ giúp?
* [Cộng đồng Discord](https://discord.gg/bYqAp4ayYh)
* [support@dodopayments.com](mailto:support@dodopayments.com)